
 e built our first hawk box using the Coulson design, for the most part. The original is available here: http://www.americanfalconry.com/HawkinGear2.html
Charlie Kaiser has a Chloroplast design available here: https://s3-us-east-2.amazonaws.com/aazkorg/wp-content/uploads/20180626151446/Hawk-box1.pdf
Folding box design: http://virtualvideo.cc/falconry/coroplast.html
Chloroplast can be ordered from TAP Plastics https://www.tapplastics.com/
A great Chloroplast cutting tool is the Coro-Claw http://corrugatedplastics.net/Coro-ClawKnife.html
One of the problems a friend of mine identified in his chloroplast box was the flexibility of the door - a bird spooked and with a sliver of sight outside the box the bird burst for the small opening and escaped because the door bent against the bird's force. This can be overcome by securing the bird at all times when it is in the box, but it must also be said that the bird is not protected from external objects or animals making their way into the box. The corners and edges may also be reinforced using Barge's All Purpose Cement to apply additional chloroplast at those points.
I discovered that I have a disability preventing me from constructing things - or constructing things correctly. It first appeared when building the mews. When I created the initial hawk box I measured the pieces as if they had no depth. So, just in case others out there are similarly afflicted with the construction disability, I have detailed instructions and materials laid out.
We completely over-engineered this box. We could have gotten away without the struts and many of the screws, but I think the extra investment gives something that will really be durable, and won't collapse when a dog leaps on it or a truck takes a sharp turn.
We made some alterations to the Coulson design and would make a few others.
- We used a brace structure on the top to hold the handle without putting stress on the walls - it distributes the weight to the framework.
- We positioned the handle to run front to back allowing for easier carrying.
- We also put in a back door allowing the box to be easily cleaned or aired out.
- A side door is the next modification we will try. It might make a good mechanism for loading in a flighty bird.
- Light inside the box really isn't a problem - it is quite dark enough even without painting the inside black.
- Lining the inside and back with newspaper and taping it in place provides easy mute removal.
- I would like to also put a locking mechanism hidden inside the frame of the box so the leash can be secured and locked down there.
- Although there is plenty of head room, I will make the next one with about one more inch. I could lower the perch by an inch or more, though - there is plenty of tail-room.
- I'm debating the width. It's very nice to line up narrow boxes in a row when you have multiple falconers hunting out of the same truck. However, it is more easily tipped over having a higher center of gravity - but it is easily stabilized against other boxes or with a bungee cord. If I load Patty in beak-first, then she has to turn around inside the box. Feathers do bend as she turns around. Perhaps a wider box would put that point of bend at a less desirable position on the feather shaft - I'm not sure if wider is better here or not.
- There are many similar plans using Chloroplast or corrugated plastic. I realize these are lighter weight and easier to carry, but the stability that the wood box gives me and the security is worth the weight. If you have dogs loaded into a truck that are getting anxious to hunt, they can bounce all over. I trust the wood to put up with that and the rough roads we sometimes drive over to get to hunting grounds. Also, be careful with Chloroplast as its edges will slice as well as a knife.
Other notes to be aware of:
- Leave the box out in direct sun for several weeks to help eliminate the stain, varnish, and epoxy chemicals before adding a bird to it.
- The 1" long screws will just barely not protrude - if you screw them in hard, they might poke through a bit. Make sure there are no sharp edges before introducing the bird. A sharp edge can be covered by a drop of epoxy making it rounded and smooth.
- Don't leave the bird in the box in the sun!
- Be careful of exhaust fumes (either directly from the tail pipe or being pulled in through the vents/windows/rust holes of the car). Many good falconers have gone around to the back of their truck only to discover that too much exhaust somehow got in. A carbon monoxide detector in a truck isn't a bad idea.
- Be careful of putting the hawkbox near gas equipment or pilot lights.
- Be sure the bird has proper ventilation while in the box! Birds are very sensitive to chemicals, temperature, and the quality of their air. Having plenty of air holes is good, and if there are cracks where the doors do not completely match up to the walls, it will provide all the more ventilation. Holes particularly near the top and bottom will help circulate the air and exchange hot air and cold. Some falconers have taken CPU fans from cone, especially when traveling or in hot weather. There are also small fans made for dog kennels that could be rigged up for this when traveling in hot weather.
- You could make this out of luan, waxed fiberboard, or sheet PVC, however assembly could be more difficult. Using a construction grade hot epoxy glue would get around that, though, but I have not personally tried it. A "piano" hinge can be used on the chloroplast construction and liquid nail can seal the seams. Advice from those who have made these is to not use red chloroplast since it breaks down the fastest.
- Semi-homemade hawk boxes can be made out of inverted Rubbermaid containers, waxed fiberboard drums, Sonotube concrete forms, dog carriers, and inverted garbage cans. These are round and sizable allowing for enclosure and security as well as light-tightness. Ventilation is critical with these designs.
- A hawk box that is exactly 12" wide on the inside will exactly fit newspaper, when folded. This is an advantage when trying to line and clean a box.
- When keeping a bird inside the hawkbox, it may be tempting to pull the majority of the leash outside the box. Resist this as the bird cannot regain her footing if she gets unseated. Make sure that the swivel is inside the box so that she has a better chance to not get tangled.
- Make sure that your bird's tail clears the floor and does not touch any wall.
- Be sure to keep your box clean. The bird's concentrated uric acid in the mutes produces a smell. Leaving a bird in a dirty box is not taking her health and comfort into consideration. She can also manage to get fecal matter on her feathers or skin if she moves around too much in a dirty box. This is not healthy, will diminish her ability to fly, and the waterproofing of her feathers. Make sure her box is changed daily if she uses it daily.
- Painting the outside of the box white will help keep it cool in the case that it is exposed to the sun. And painting the inside of the box black will help diminish the light and calm the bird. Chloroplast can be painted with Krylon fusion paint.
- A computer fan can be installed at the top of the box to ventilate and circulate the air. Again, be sure that there are no particles or feather dander floating around else this could irritate the bird more than benefit her.
- Some birds are notorious for moving around, like the Goshawk. Instead of a perch bar across, a stump or round perch in the middle will allow the bird to spin around without catching her tail or wing tips on anything. For birds like Goshawks with delicate feathers, this can definitely save a bird from further feather damage.
- Many different door designs have been tried - swinging door, slide in door that drops from the top down (like a guillotine), side-to-side slide door, and more. The slide doors can be difficult to quickly open or close, and a top slide-in door is very difficult to adjust so you can just peek in on your bird. One reason to put the door on the short side (front/back) is so that you can line up boxes next to each other and access them easily. A door on the long side might reduce the structural stability, particularly for Chloroplast or other flexible materials.
- Sheet metal is generally avoided by many as it heats up and traps the heat, although this might be desired in certain environments.
- Be aware of the type of bird you have and the perch setup inside the box. A bird can easily fall off the perch, or step off, and get caught behind the perch or under it. In these cases a bird can become tangled in her leash. Simple adjustments, even some cardboard taped in place, can help prevent a bird from taking a wrong step.
- Some like the easiest and cheapest solutions and have recommended a paper towel shipping box lined with newspaper. With box cutters doors and ventilation can be cut in the sides. These can also be discarded or recycled instead of cleaned.
Materials:
- One husband - for measuring and cutting
- 2 pieces of plywood (1/4" thick) cut to 22" x 24"
- these are the left and right sides - 2 pieces of plywood (1/4" thick) cut to 22" x 12"
- these are the top and bottom - 2 pieces of plywood (1/4" thick) cut to 12" x 24.75"
- these are the front and back - One 1.25" diameter dowel rod cut to 11"
To create the supports and frame:
- 4 - 0.5" x 0.75" pieces cut to 19" long
- 4 - 0.5" x 0.75" pieces cut to 24" long
- 2 - 0.5" x 0.75" pieces cut to 9.75" long (perhaps just a hair less)
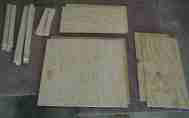
Some of the wood materials. If you don't have a table saw, Home Depot (or other lumber store) will usually cut the pieces for you. You may have to do some fine cuts or rasping to get pieces to fit exactly. Having some scrap lumber made it easy to keep pieces off the floor while they were being stained or varnished.
Hardware:
- 50 - #6 1" wood screws (get a box, not bags, as they are cheaper)
- 4 Hinges - make sure they come with small screws; adding some epoxy to hold them in place is a good idea
- 2 Midget louver vents - these have a 2" hole, but measure roughly 2.5" across the external face
- probably in the roofing section of the hardware store - 2 Latches - some mechanism to keep the doors closed
- Manila rope - 3/8" - 50' long
- Glue - two part epoxy
- Latex gloves (or plastic bag to protect your hands while gluing)
- Plastic knife and plate - to mix epoxy and smear it (not necessary, but makes it easier - coffee stirrers, stick, anything will work here)
- Paint brushes - 4 cheap ones if you don't want to bother with cleaning them
- Stain - I used MinWax Golden Pecan Wood Finish which is oil based
- Varnish - I used Man O' War Marine Spar Varnish - 7509 Gloss, again oil based
- Sand paper - 100 grit for pre-stain sanding and 220 grit for between varnish coats
- Tack cloth - to prep surfaces for varnish
- Leather - to wrap the handle
Tools:
- Drill - we didn't drill holes before screwing, but you can. Having a drill to screw in all the screws is definitely easier, but may not give a perfect finish. I also have a drilling disability.
- Drill bit for handle holes - we used 1/2" drill bit
- Drill bit for air vents - 2" for the vents I found
- Hand saw
- Wood rasp - to finish edges and get a good snug fit
- Level - level throughout to ensure your box is square
- Tape measure
- Newspaper - to protect floor from stain and varnish
Construction
The left and the right side:
This will start with the pair of 22" x 24" plywood boards, four 24" long supports (two per side), and four 19" long pieces (two per side).- Lay out the two 24" long pieces and the two 19" long pieces to frame a square that the plywood piece will lay on top of.
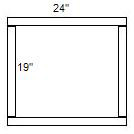 View from what will be the inside of the wall.
- Lay each 22" x 24" piece of plywood over each frame.
- On each 24" side, measure in by ¾" and drill screws across at 4", 8", 16" and 20".
- On each 22" side, measure in by ¾" and drill screws across at 2.5", 5", 17" and 19.5".
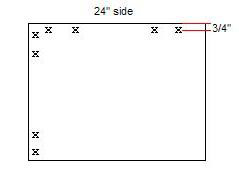 Here one 22" side has been screwed and one 24" side has been screwed. View of the outside of one wall.
- For the ventilation, identify the rear edge of the left side. Measure in from that edge 5". Measure down from the top edge 4". Center a 2" hole on this point - the midget louvre will be inserted in this hole. Repeat this same process on the right side. I realized this design piece too late and had to drill these holes much later, so the following pictures will not show these holes.
- You will need the two 22" x 12" plywood pieces. The top and bottom will be screwed onto the framing pieces you added to the sides. You will probably want to start the screws in the two pieces of plywood so it's easier to put together.
- On the 22" side of the bottom, start the screws at ¾", 7", 15", and 21.25".
- On the 22" side of the top, start the screws at 7" and 15" to start with.
- Turn the side pieces upside down and attach the bottom first.
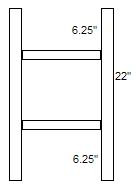
Since the handle to carry this will be passing through the ceiling, we added struts to load the weight to the frame rather than the sides. Take the two 9.75" long pieces of 0.5"x 0.75" framing wood for these two struts. - Measure in from the front 6.25" for the front edge of the first strut - this will center the front strut at about 7".
- Measure in from the back 6.25" for the back edge of the second strut - this will center the rear strut at 7". Add a single screw through each side into each piece to hold the strut to the side frame - at the center 7" from the front and the back.
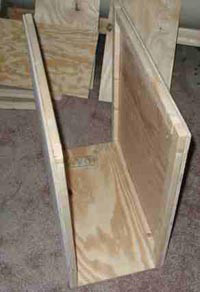
Top view of the left and right walls and the struts placed between them.
- Measure in from the front to the center of the first strut to see where to drill the hole so it passes through the center of the strut. Do the same for the back. These should be at roughly 7" from the front and 7" from the back for the struts respectively.
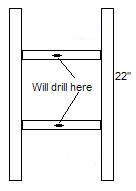
Looking down (and without the top shown), this is how the holes will be drilled through the struts.
At this point I applied 3 layers of stain to the entire box letting it dry thoroughly between coats. I then varnished it with a good coat, let it dry thoroughly, sanded lightly with 220 grit sandpaper, tack clothed it, and applied another coat of varnish. If you have cheap wood (like mine) darker stains will cover more of the flaws. I used the MinWax Golden Pecan and the Man O' War varnish. You can't mix the water soluble stains with the non-water soluble varnishes, so you will have to select one line or the other.
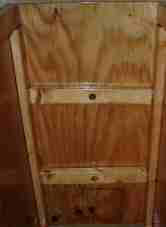
Here's the ceiling structure of the inside. - The perch will need to be just about 11" long, although you will likely need to rasp it slightly and sand the edges to get it to fit snugly into the box.
- Measure in from the front edge 7" and up from the bottom 7" and center the perch on this spot. Make sure it's level. Re-measure and identify the center of the perch from the outside (might need to tap to make certain you'll hit the center of the dowel). Drill through the side and into the middle of the perch followed by adding the screw in for each side of the perch. This should secure it well, and allow for you to remove the perch should you ever need to.
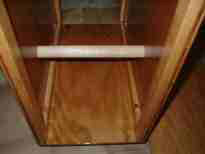
Here's the box with the dowel in place before it has been wrapped.
For wrapping the perch I got a piece of scrap dowel to practice with. I put plastic sandwich baggies over my hands to prevent getting epoxy all over me. Using a plastic knife for spreading the epoxy is a really good idea as the chemical reaction heats up pretty quickly. Also, a plastic or paper plate and a plastic knife was perfect for mixing and applying this. - Fray one end of the rope slightly. Glue it down carefully to one side of the perch, preferably on the bottom-facing part of the perch.
- Smooth the end down and let it set until fully dry.
- Start wrapping the rope around the perch keeping each wrap taut. Every three wraps use a hammer to tamp the wraps down tighter to each other.
- Once you've wrapped the entire perch, one final wrap will essentially need to be stuffed into the space left between the wraps and the wall. Apply a layer of glue to the exposed wood in this space, then stuff the rope in and hold tight for several minutes.
- After glue is completely dry cut the rope so it's flush with the wraps. You could smooth it down again with glue, but this appears unnecessary.
The Top and Bottom:
The Perch:
Attaching the doors:
We attached the front door such that it was hinged on the right-hand side as you look at it straight-on. This allows the gloved hand to be right there at the crack of the door opening and not be maneuvering in at an odd angle. I haven't found it to have been a problem had the door opened the other way, but if a bird is prone to bursting out, this extra bit of control might make a difference.The back door has the lock affixed on the inside - mostly this was so I could tell which door was the front and which door was the back. That limited the direction of opening it as the locks don't have a wide variety of mechanisms for something this small.
The Handle:
The same sisal rope used for the perch was used for the handle. Passing it into the box through the holes, then knotting the end worked well. I used a bit of epoxy on the knots to ensure they would not come undone.
Last, I took a strip of suede and wrapped the handle several times cushioning it and making it a bit thicker. I did affix this to itself with Velcro so I could remove the suede if I wanted, but this was another over-engineering issue. It would just be easier to cut the rope handle than try to sew through that thick suede again.
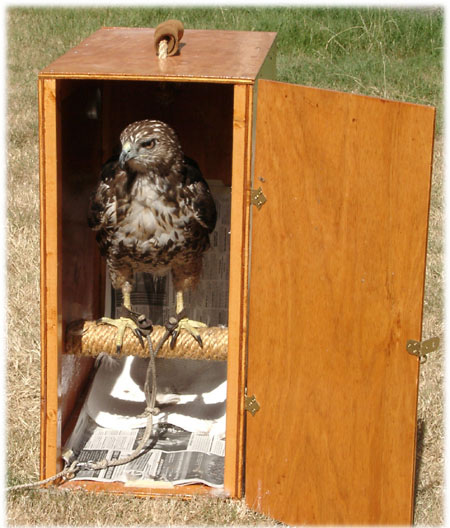
Here's the finished hawk box with a 1220g Red-tail pictured inside.
Red-Tailed Hawk loading into a hawkbox video clip: 2.5 meg
Note: If video clips do not launch automatically on your machine, right-click the link and select Save Link As... to save the video clip locally. The clip can be saved to your desktop, double-clicked, and played from there.
Finished dimensions:
Outside:- 22.5" deep x 11.75" wide x 24.75" high
Inside: - 22" deep x 10"/11" wide* x 24" high
* Measuring the narrowest point inside the struts gives ~10", the widest point measured at the perch is 11". - 19.5 lb
Finished weight:
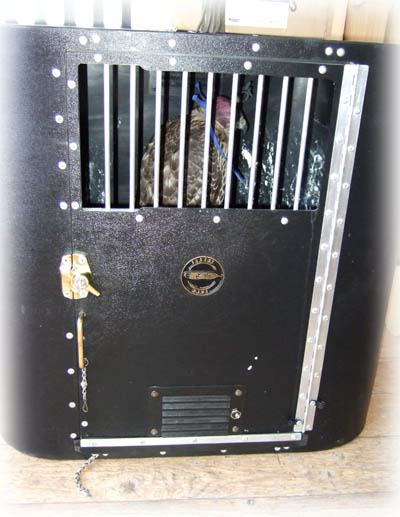
Another nice hawkbox for a bird that is hooded. This allows excellent air circulation and ventilation as well as visibility into the bird, yet protects her from any disturbance.
Another method for creating a hawkbox is to invert a Rubbermade™ container, insert a perch, attach a handle, and cut a door into one end.
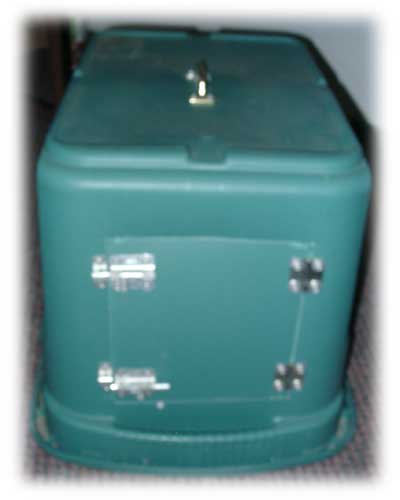
Outside of a Rubbermade™ hawkbox.
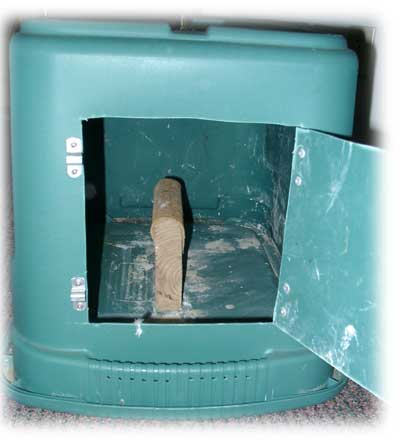
Inside view of a Rubbermade™ hawkbox.