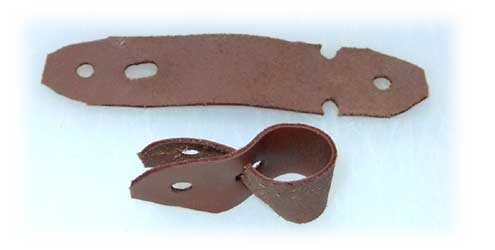
The bird's anklets are the piece of equipment that comes into constant contact with her, and as such must be comfortable and safe. The precise design doesn't matter so much except that it must be safe and comfortable. For small birds like a Kestrel, lighter weight or split leather works well. For heavier birds like a Red-Tail, heavier leather such as 3-ounce weight is usually preferred. Kangaroo is the preferred leather for most birds. It is light weight and very strong. Eagles will do well with elk hide and birds like a Red-Tail can use cowhide. Regardless of what leather you use, make sure it is vegetable tanned and not treated with heavy metals. This is both as a skin irritant and in case the bird chews on the anklet or manages to swallow it.
If you are only getting started and only need to make anklets and jesses, then a local crafts store or shoe repair shop may have a few feet of inexpensive scrap leather for you to use. The test of these scraps will be their strength. If the leather you use is not strong, it will break when a bird bates, possibly putting her in danger. The leather needs to tolerate temperatures, water, and drying and will get somewhat brittle. It will stretch and weaken, so a strong leather is needed. Many falconers have a kangaroo hide around and they may sell you a small amount or help you make your jesses to get you started. Eventually you will want to purchase your own hide or half-hide for all your leather needs. Falconers sometimes combine orders to get good rates on kangaroo and other hides. Be sure to store any hide in a dark dry place to prevent it from degrading or breaking down.
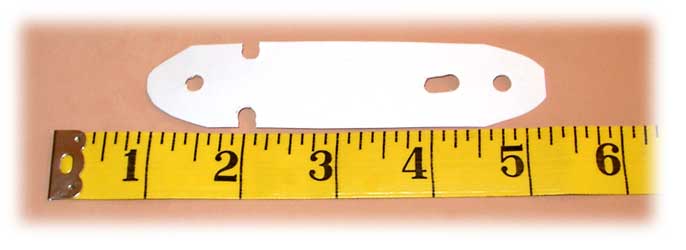
You will need a few pieces of equipment to begin. A template of the anklet you will be making, a hole punch, and a scalpel or razor blade.
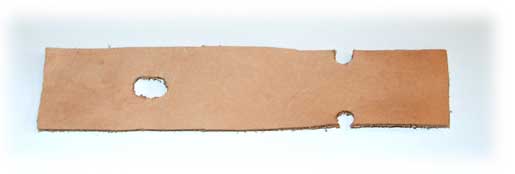
Start by finding a section of the hide that is strong. Grab opposite sides of the hide and pull hard. It the hide does not stretch much and does not break under the constant pull, then select two different sides of this section and pull hard. This will test the four different directions across the hide's grain. If the section of hide is strong and even (no area is more thin than any other area), lay your anklet template down and trace the first anklet. Repeat for the second anklet.
For a general rule of thumb, a female Red-Tail will need about 2" of leather for the section in contact with her leg. A male Red-Tail will need roughly 1.5". Another way to size is with a pen as it may be roughly the size of your bird's leg. An AA battery can stand in for a Peregrine or Red-Tail. An AAA battery can be used for a Cooper's Hawk with the anklet fitting quite tight on the AAA battery for sizing. Some with kestrels use 1/4" wide anklets, others prefer 5/8" with 1/4" hole for the jesses. Some birds do better with loose anklets, some with slightly tighter based on the way they ride up the leg. Some birds do better with very soft and pliable anklets while others do better with very stiff anklets shaped to a ring. Some do better with narrow bands and others with wide bands. If you try one, watch what it does given your bird's behavior, the setup, and your management. If it doesn't work, switch to something else.
 |
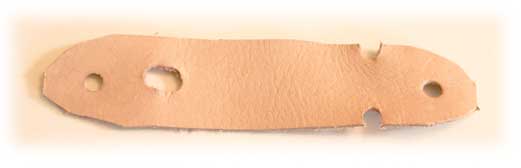
With a sharp scalpel, carefully cut the shape of the anklet out of the hide. The hole for the anklet to pass through itself should run lengthwise, not side-to-side. If it runs side-to-side it will weaken the leather and make it prone to tearing. Ideally, it will be roughly circular as that also prevents the leather from tearing. Straight lines or cuts weaken the design.
 |
The hole punch is the preferred way to cut the holes for the jesses, but a carefully wielded scalpel can be used. Make sure that the jess knot or button is large enough to not pass through the hole you just made. The hole will stretch out over time, so make it as small as possible else the jess will slide through and your bird will get loose.
 |
Before you go much further, you will want to try the anklets on the bird they are intended for.
You will now start to soften the leather. Wrap it around, massage it back and forth, insert the notched end through the slit in the other side, and start to work each strip of leather. It will soften some, but will need to be worked to soften it up enough.
Fringing the edges works well for some birds and not well for others. Some birds tend to collect grit in the fringes, particularly if housed on sand. As with most of the designs, you will have to try a style and evaluate what works for you. To fringe the sides, lay the anklet back down flat on a cutting board and start to fringe the edge of the area that will be against the bird's leg. This will help the edge to roll.
Continue working the leather to soften it. Fasten it and unfasten it and roll the edges. When placed on the bird, the smooth side will be against her leg and the sueded side will be facing outward. However fasten both ways, work it in all directions, and test to make sure that the jesses will fit in the holes.
 |
Finally, take a leather treatment such as Pecards and apply to the leather. This will help make it even more supple and soft and will help it stay strong and prevent rot. I like to soak the anklet well, then wipe of any excess letting it sit for a day before putting it on the bird. Some falconers like to write their name and phone number on the anklet and cover that with a coating of clear nail polish. While I have not tried that, you would need to ensure the leather treatment would not bleed the writing.
 |
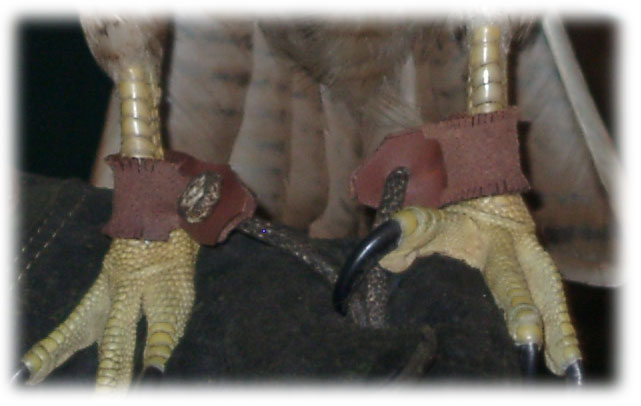
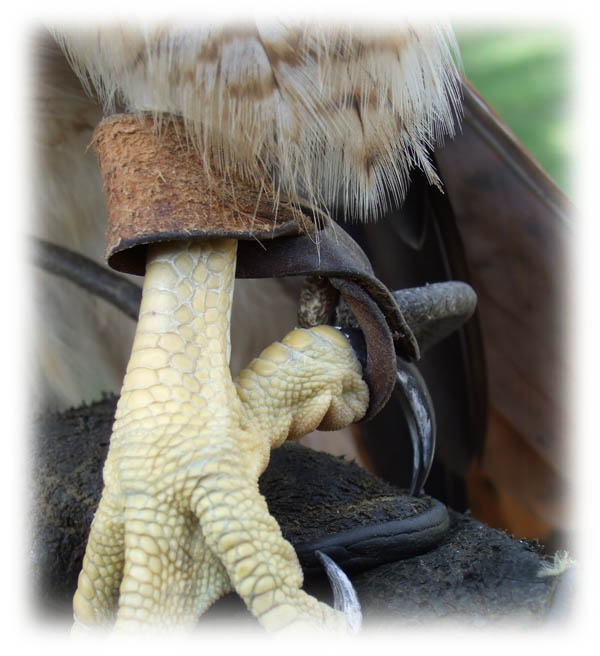
When you put these around the bird's legs, they should not be too snug or binding. They should be loose so that if the bird held perfectly still and you held the anklet, the entire anklet could be held around the bird's leg with it just barely not touching her tarsus. Some falconers like to line the anklet with Dr Scholl's moleskin on the inside.
 |
 |
Some falconers like to put grommets in the anklets. Since it may require casting a bird, and it only adds metal which may rub on the bird, I prefer not to use grommets. The anklet can serve as a handy place to attach transmitters or bells if you like.
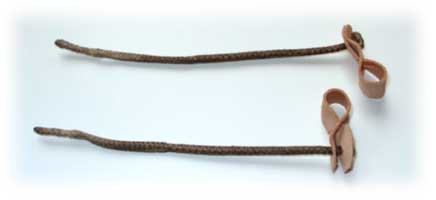
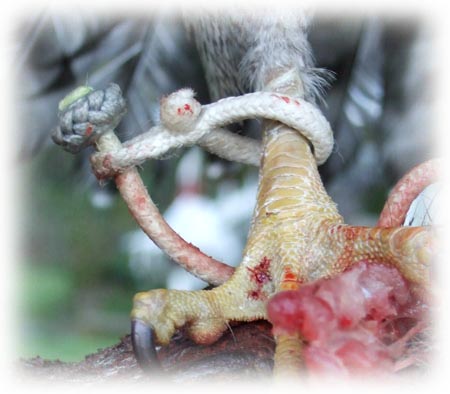
Rolled anklets can be made with a strip of kangaroo, about 6" long and just under an inch wide punching holes similar to the anklet above to allow one side to pass through the other. The leather can be wetted down and rolled with the smooth side on the outside of the roll. Try to keep the roll tight as the point is to make stiff, narrow anklets with this method. You will likely need to wet this several times and allow it to dry. You want the seam to run straight along the length of the outside of the roll so that it will not be against the bird's leg when it is finally applied. Once the roll will stay in place, curve it around a pen or battery to the shape and size you need with that edge pointing down, and pass one end through the other for creating the diameter of the anklet. Because it is doubled over on itself and the rigid style, you will want an anklet that is more roomy around the leg than the above style. You may need to wet and dry the anklet several more times to smooth it all out and get the shape you want to hold. When it is all firmed up and dry, you can punch the jess holes, and trim the edges appropriately.
Again, if one style does not work, try another style or modification. I have seen these work beautifully on birds, yet the same equipment by the same maker can damage another bird's leg. It depends on the bird, the morphology, the movements, and more. Listen to your bird and observe what works for her.
These anklets use a similar principle to the rolled anklets, except they are braided.
 |