ire perches are some of the safest perches you can have for your birds. This is, literally, a 15 minute job to get a functional perch. Additionally, the cross-tie of plastic coated wire means two of the wires would need to fail simultaneously for the bird to get loose, and they give slightly when the bird bates. With this perch the bird has options for her orientation, and it is particularly safe for a freshly trapped bird. It can be cleaned and sanitized, another factor important for a freshly trapped bird of unknown health. There's nearly no way for a bird to tangle in this setup unless she has a swivel caught or not functioning properly. The perch is portable, yet has enough weight to resist being easily moved even by a Red-Tail Hawk.
Notes to be aware of:
- The tire can be modified if necessary. It can become hot when left in the sun, but in that case the tire and bird should be in the shade anyways. You can trim the surface to the proper diameter for your bird's foot and cover with cork, cocoa mat, white latex paint, or wrap with sisal depending on your bird, specific management, and climate.
- Get a tire that has the wall where the tread is flat (very little tread) and straight to avoid the leash catching on it. Make sure that the perching surface wall is narrow and appropriate for the bird's foot size and shape. The tires that tend to be the most like this are those little speedy racing tires.
- Water can collect in the wall that will be on the ground. If this looks to be an issue, drill some holes along that side to prevent water from being held there or use a saber saw to cut the lower edge out. This will prevent it from holding water, mutes, or feathers.
- If you have a very lightweight tire or a very strong bird, consider pouring some concrete or plaster of Paris into the tire to add weight. Alternatively you can toss in some stones or stake the tire in the ground.
- Tires can usually be had for free from any place that sells tires. Go in and ask if you can have one that is to be recycled. They normally have to pay ~$1 for each tire to be picked up and recycled, so you taking one for free is usually seen as a favor to them.
Materials:
|
Tools:
- Drill
- Drill bit for the cable
- Ratchet or socket wrench for tightening the clamps
- Wire or cable cutter
- Exacto knife or box cutter
- Loctite and popsicle stick to apply it
- Pliers
- Soap
- Scrub brush
Construction
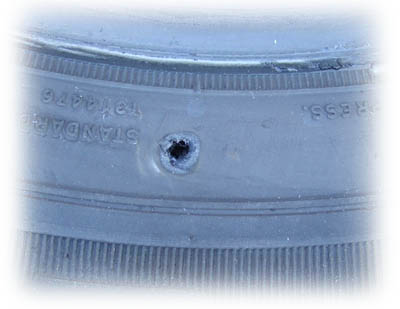
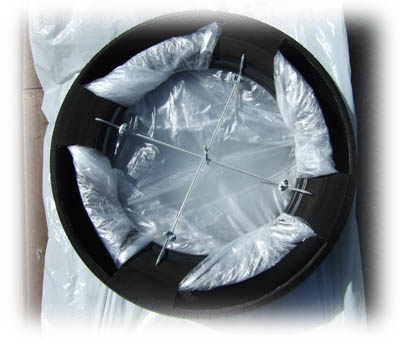
Before beginning true construction, start by scrubbing and rinsing the tire well to remove any oil, gas, particles, or chemicals. The bird will be standing on this and possibly eating on this, and the tire should be clean for that. Start by laying the cleaned tire flat on the ground, the perch side down. Drill four holes through the wall of the tire which will be setting on the ground. The holes need to be big enough to pass the cable through. Two will be directly across from each other, and the next two will be directly across from each other. Additionally you can also cut 4 strips out of the paneling to allow water and dirt to be easily removed. You could remove the entire bottom if you want, but then the cross ties would need to be attached to the walls of the perch, and the perch loses some structure without this base.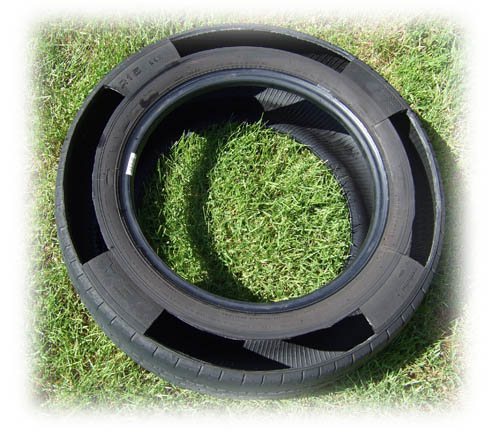
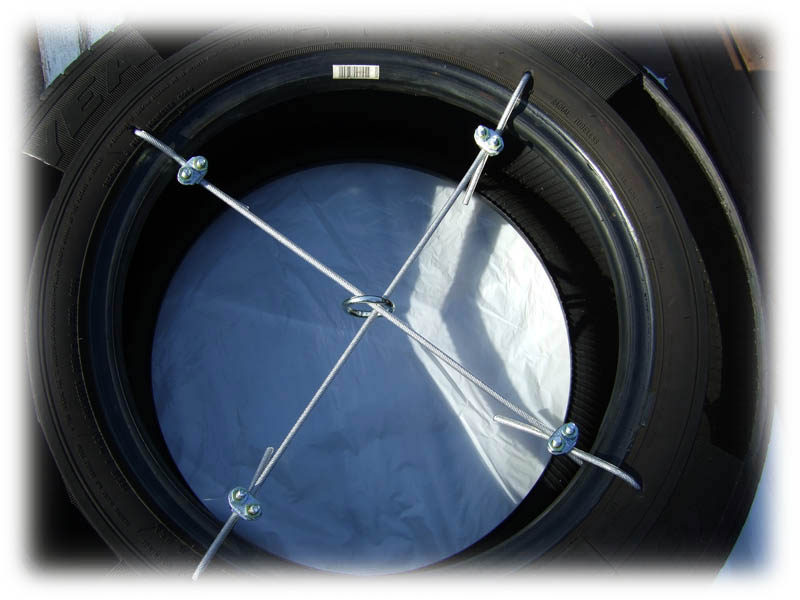
Thread the cable through one hole leaving a tail of a few inches. Attach one clamp to this end so that the screw on the clamp points upwards - when the tire is flipped over the screw will then point downwards.
Measure out enough cable to run it across to the opposite side hole and clip the cable with enough length that there will be a few inches left over. Make sure the cable passes through the O-ring. Pull the cable across tightly so that it is taut and then attach the second clamp.
Repeat the cable run on the second set of holes. Again, make sure the cable passes through the O-ring. The ring will be caught on both cables so that it does not travel.
At this point you have two cables crossing in the middle with the O-ring at the center. Dot some Loctite or epoxy glue over the U-bolt screws to prevent them from loosening.
Once the glue is dry securing the nuts to the U-bolts, you may want to smooth the points of the U-bolts to ensure that a leash won't catch on it. You can use a blob of epoxy or some electrical tape to run over this smoothing over any ridges that would catch a leash. Since the screws are all pointing down, the probability is very low, but smoothing may help.
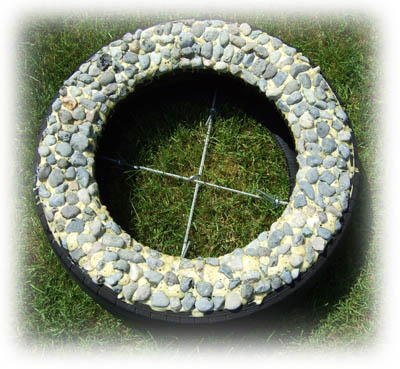
Once this is done, turn it over and you have a perch. It's not the prettiest thing, but it is easy to keep clean, and very safe, especially for a freshly trapped bird. To make the perch individualized, tailor the diameter to your bird's feet. The addition of alternate perching surfaces such as cork, cocoa mat, or sisal can tailor this perch to your own climate and management techniques. Some falconers who have experimented with different textures have observed that birds seem to generally prefer the plain tire without anything added on. You can also put concrete or large rocks into the tire to further weight it down if necessary, however I have not found concrete to be worth the effort as a solid piece poured in will crack over time. The tire can also be painted white for arctic birds, and they may prefer this.
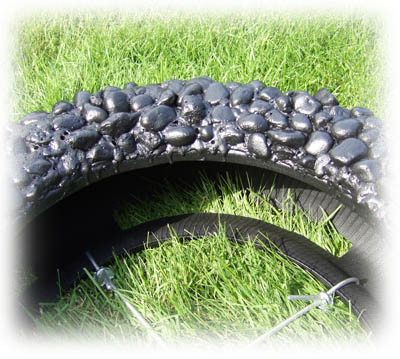
Another modification is to make the perching surface uneven mimicking a rocky ledge or natural uneven surface.
Materials:
|
Construction
Keep all animals away from this until finished! With the glue and spray, you will want this in a very well ventilated area, and away from birds, kids, expensive cars, etc. Follow all directions for the glue and spray you are using.Take your clean tire and insert plastic around the cross ties to prevent glue from dripping on it. Newspaper is permeable and the glue will seep through, so plastic is the best choice here.
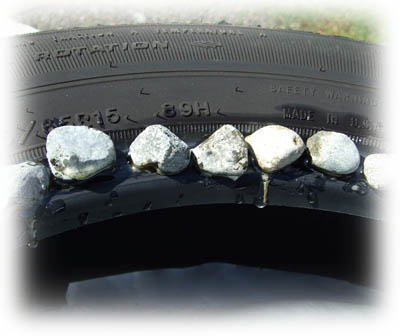
Lay out a few handfuls of rocks on a flat surface. With the hose, wash these off well to remove dirt, dust, and anything that would prevent them from sticking well. The rocks should be damp for the next steps. You will start by working on a single inner ring around the inner lip of the tire. Using the spray bottle, mist 1/4 of the tire's lip. Apply a bead of Gorilla Glue across the wet area. Grab a handful of the washed rocks. The best for this part are the longish ones or small round ones, either of which will rest naturally in the tire's inner lip. Place a rock on the glue ensuring it sits without having to be held in place. Continue placing rocks end to end until you reach the end of the bead of glue. Leave a small space between the rocks so that as you place them they don't bump the whole line. The glue will also expand, and this will allow for that.
Continue spraying, applying glue, and applying rocks around the rest of the tire lip. This will create a dam against which all the other rocks will stabilize. Once this ring in completed, allow the glue to dry for several hours. As the glue expands, it will drip onto the plastic. Don't worry much about trying to prevent drips.
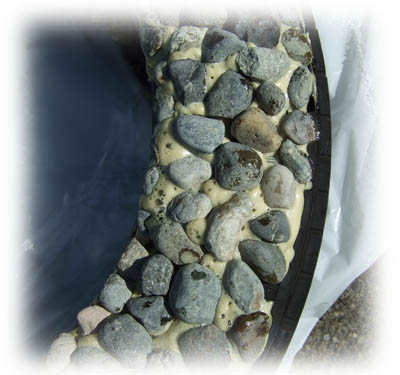
Once the inner ring has dried, you'll continue to rock the rest of the perch. Pour out a good amount of rocks and wash them off with the hose. Work the tire in sections. Start with a quarter of the tire and mist the section closest to the ring of rocks. Apply a thin amount of glue. Start grabbing rocks and setting them on the glue. This section is most stable and can take larger, round rocks with less surface area. Once this area is covered, mist the rest of the section and apply glue and rocks. The farthest points away from the center are the least stable. A rock that sticks up here is likely to get bumped and knocked off. Using rocks with a lot of surface area against the tire will help them stay put. Very small rocks can be applied at the farthest points to help everything stay in place. Once this section is complete, repeat on the other three quarters until the full tire is rocked. As you finish the last section, take a look at the earlier sections and make sure the glue has expanded sufficiently to hold the rocks well. If it has not, apply another drop between the rocks in those open spaces. Allow to dry fully, at least 24 hours in good temperature, sun and ventilation.

With a plastic sheet, cut a hole in the middle just large enough for the tire to fit through. Arrange the plastic around the tire taping it into place. This will allow you to mask for a clean line (if you care). Stretch out the rest of the plastic sheet to protect the surface you're working on. You will likely need to weigh down the corners of the plastic sheet - leftover rocks from rocking the tire will work.
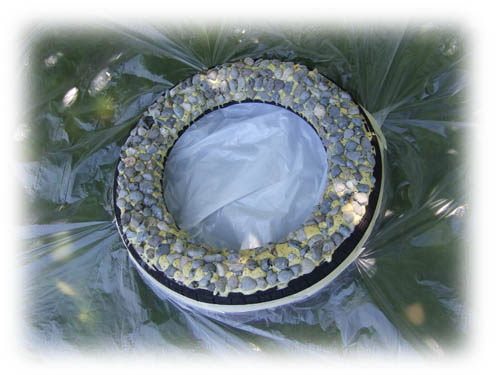
Begin by spraying a light coating layer over the tire. Allow to dry per instructions. You will continue applying several layers and ill need to get it form several angles to ensure everything is covered. Allow to dry completely and to cure in direct sunlight and rinse well a couple of times before introducing to birds.

The advantage of the truck coating is that it seals the rocks so that the tire surface can be cleaned off well from bits of meat or mute. It also gives a tidy appearance.